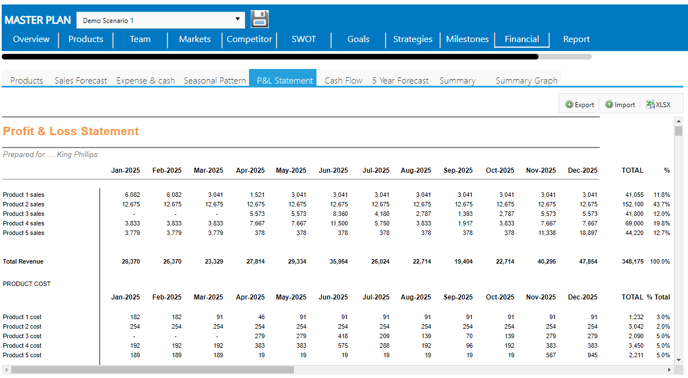
Conversely to the previous components of the plan, the financial section has several subsections within it, when you first enter the financial tab, you’ll be greeted with the Product section. Here we will see the information you input back at the start of the plan, in the “Products” tab, you have an opportunity to review the information before proceeding. Remember, we will likely be leveraging a significant amount of the actual data from Xero/QuickBooks Online and as such it is critical to ensure that the products are categorized correctly. One section that won’t be provided by the import is the “Annual Increase”, which you will have to input manually.
The second section of the financials tab will involve you completing the information required for five years forecast by reviewing the desired annual increase for the additional four years.
In the next section, titled “Expense & Cash,” you will be adjusting the expense line items (particularly their name) and their annual increase as per the previous sections. You can manually input in the expense figures from here; however, we can also bring in the data from their accounting platform, which is the recommended approach.
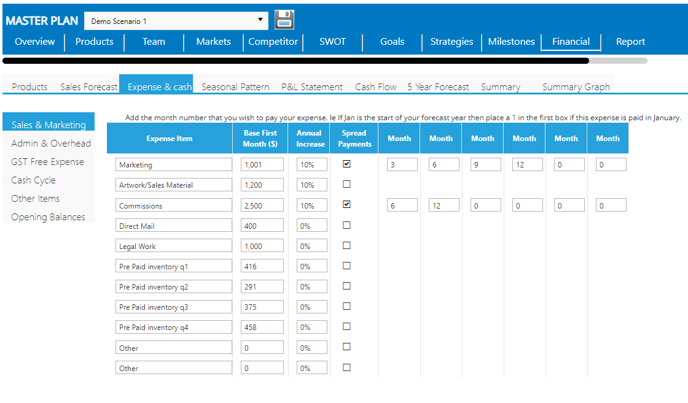
There are three components to the expense area which should provide you with the opportunity to produce a robust chart of accounts. We would certainly consider reviewing the intention of the plan at this stage as you may be able to summarize the client’s chart of accounts via the default line items generated by the plan, or you can adjust the line items within the system to reflect the source accounting platform 1:1 (E.g. Xero or Quickbooks Online). Traditionally we find that this decision is made based on whether the plan is going to be primarily used internally or if it is going to be supplied to external agents for financing, loans, or other broad objectives.
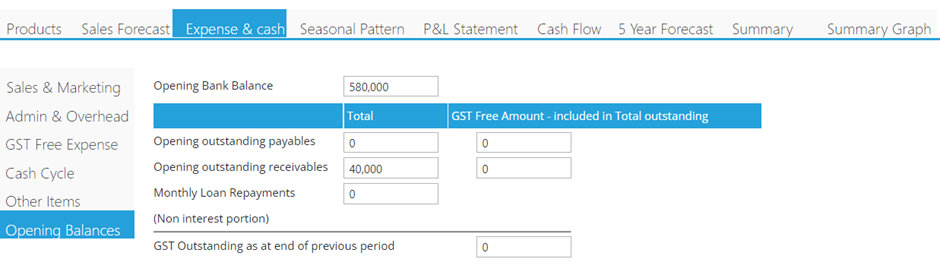
Moving past the expense component, you will then review and the cash items which allow us to generate an accurate projected cash flow statement. This includes inputting opening bank balances, capital injections, outstanding loans and other critical items that will affect the cash flow. The data for this section will not be drawn from the accounting platform import, as such we have endeavoured to make the process as streamlined as possible, you can simply input this data manually via following the prompts within the system.
The final set of inputs are held within the seasonal pattern section, which is another section that you can ignore until the financial data has been imported into the system. In most instances you will not have to touch the section as it will be filled out via the import.
 Now that your plan has been prepped to accept your financial data, it is time to bring the data in and connect it to the plan. First, we will utilize the “Financial Integration” prompt available under the "Home" menu option to facilitate a connection between the clients accounting platform and their MAUS Hub account.
Once inside the Import screen, all that is required for this step is selecting the accounting platform in question, selecting the date range you wish to import (we recommend a years’ worth at minimum for the best result) and hit submit.

You will then be redirected to the accounting platform of your choosing, requesting to login and authorize the connection for your client’s financial account, and finally, be redirected back to our system for the concluding authorization. This will complete the import phase and allow us to move the map accounting data prompt.
Moving back to the "Financial" section of the Strategic Plan, we invite you to review the top menu of the module, as next to the Scenario selection tool & the "Save" prompt, you will find a "Cog" prompt which will allow you to access your financial mapping tools:

In this area, you will review the line items from the accounting platform and connect them to the line items previously reviewed within the Business Plan. This system has an auto mapping feature which will do most of the work for you, making your job primarily a quality check on the Auto Mapping process.
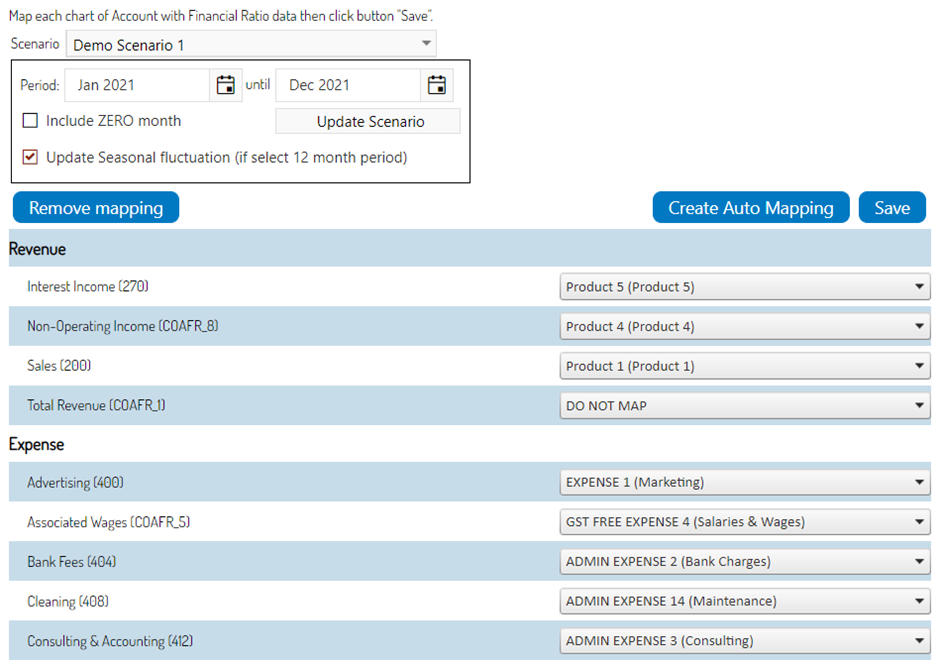
Your job here is to review the line items in question to ensure that they have been mapped correctly. In most instances the system can perform 90%+ of the mapping for you, with you correcting any errors manually. This percent tends to increase if you have already adjusted the line items in the plan to match your client's accounting platform. Once you are comfortable with the mapping, you can then press the “Update Scenario” prompt to transition the accounting data into the plan. We would recommend reviewing the PNL, Cash Flow and 5 Year Forecast prior to delivering to the client to be sure you’re happy with them, in most instances only small touch-ups will be required before the process is complete and you can then proceed to the reports.